pfSense is an open-source firewall and router software based on FreeBSD. It provides powerful network security features such as stateful packet filtering, VPN support, traffic shaping, and intrusion detection, all accessible through an easy-to-use web interface.
Objectives
- Learn to utilize pfSense to protect internal network.
- Services configuration: DHCP, DNS, SSH, VPN
- Firewall rules
- PFBlockerNG: GeoBlocking, DNSBL
- IDPS: snort testing
Setup
- Download & install
pfSenseon your hypervisor (I use Virt-Manager) from this video or any other but watch videos from 2025: https://www.youtube.com/watch?v=Y-Dj8lHmXy8 - pfSense requires a WAN interface to be configured. The LAN interface can be skipped and configured later.
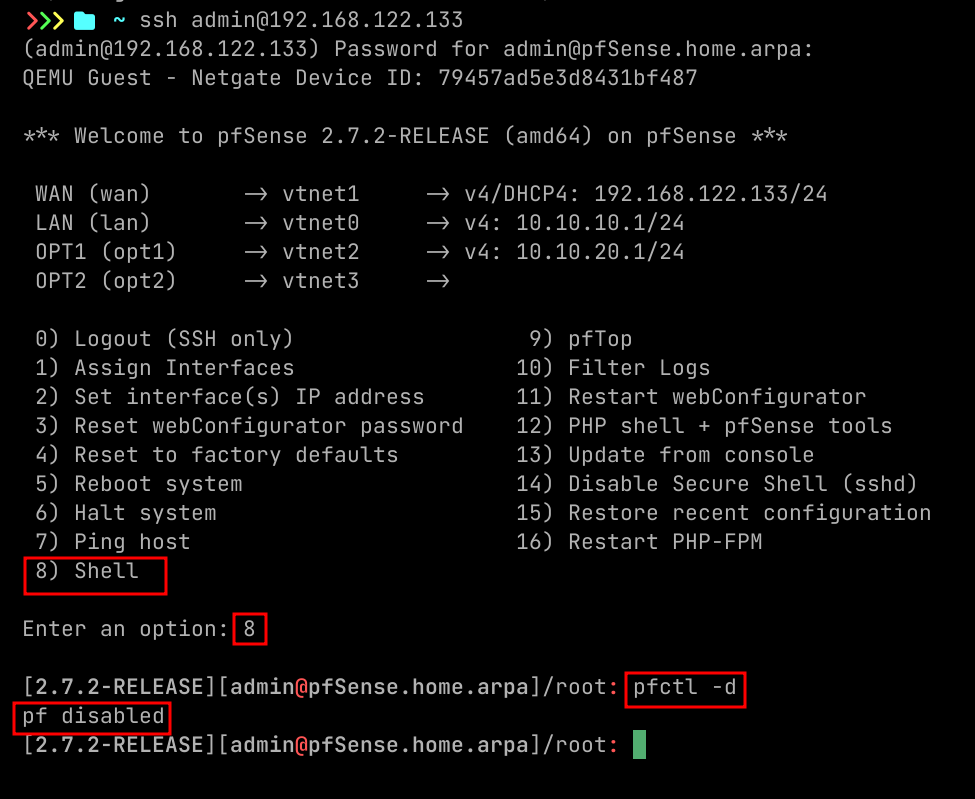
Access Admin interface from WAN interface
- By default you cannot access admin interface from WAN subnet like from your host machine, for that quickest way is to disable firewall temporarily.
- I ssh-ed here, we will see later how to enable that.
- Command to disable firewall.
pfctl -d
- Then go to that WAN IP of the pfSense on the browser to access it.
Enabling SSH Access
To manage pfSense remotely via SSH, you need to enable and configure the SSH service.
Steps to Enable SSH
-
Log in to the Web GUI
- Default : Username:
admin, Password:pfsense
- Default : Username:
-
Navigate to SSH Settings
- Go to: System → Advanced → Admin Access
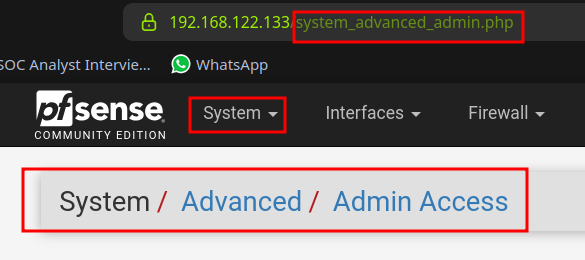
- Scroll down to the Secure Shell section
- Check the box: "Enable Secure Shell"
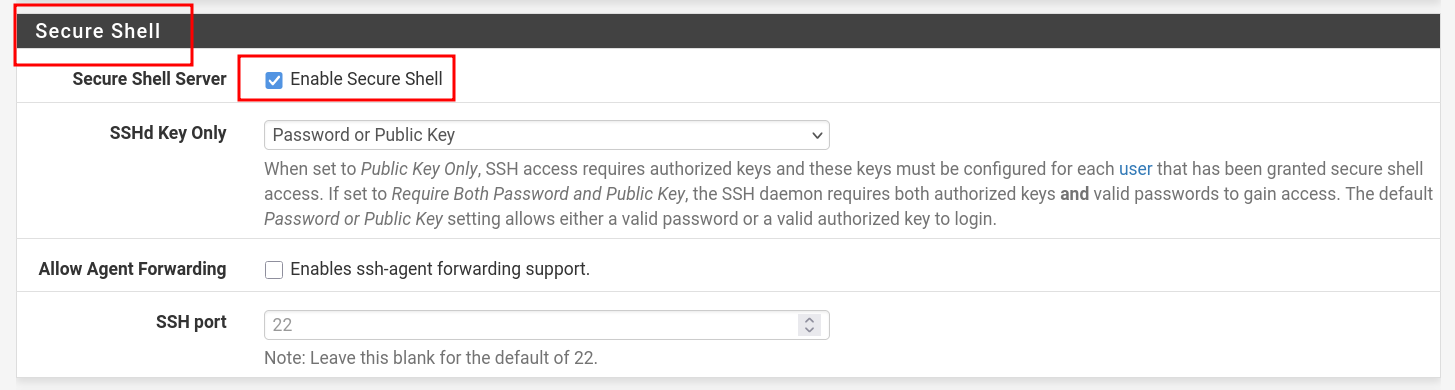
- Scroll all the way and click "Save"
Configure pfSense Firewall to Allow SSH
- Go to: Firewall → Rules → WAN
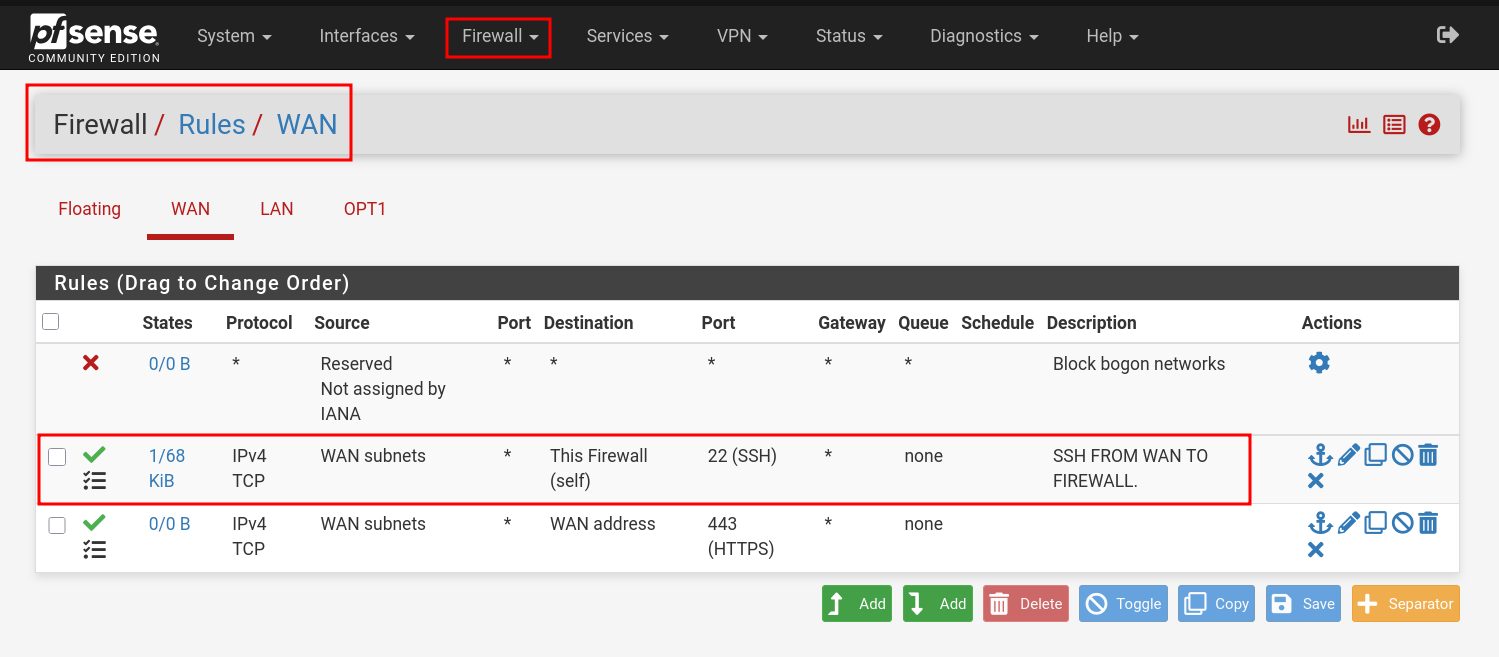
- Click on "Add"
- Do as image suggests and click "Save", change WAN to LAN as per your preference.
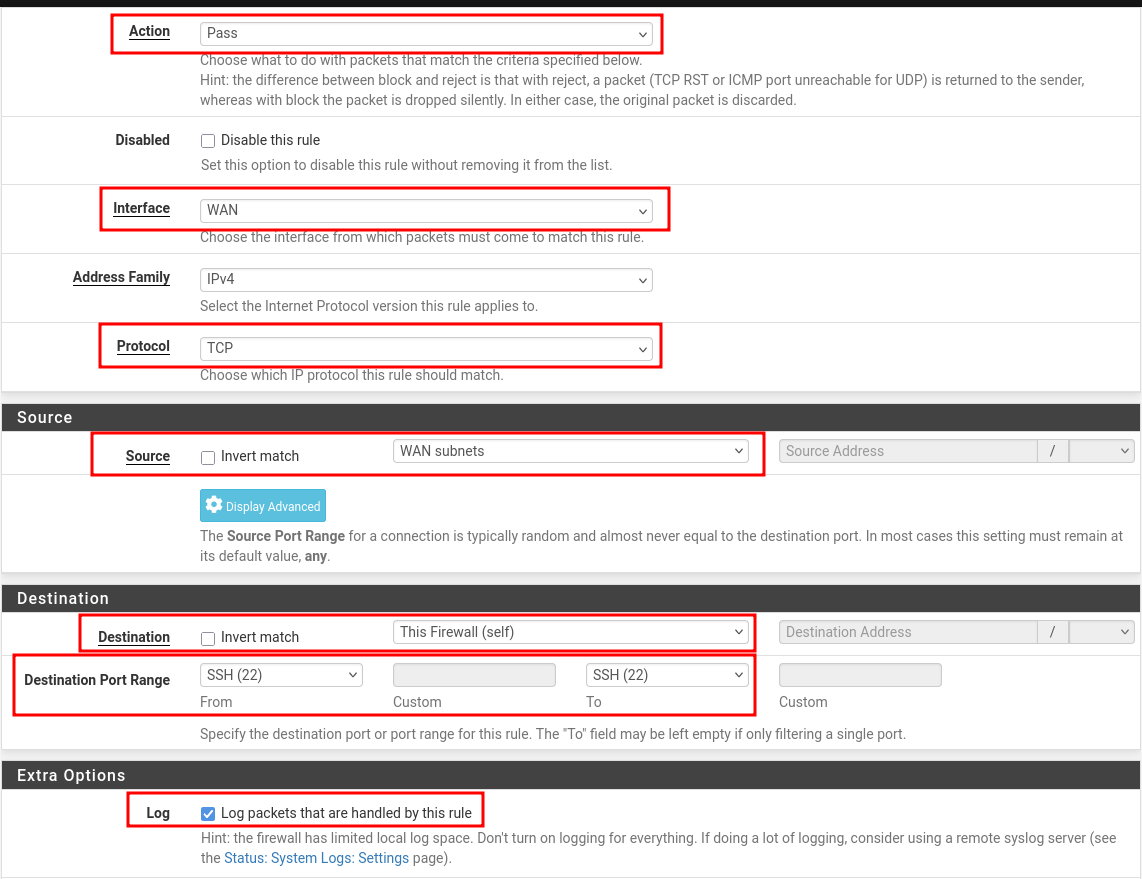
- Click on "Apply Changes". Most important one, I was troubleshooting without applying changes for some time :)

- Access via Terminal
- Type your admin password when prompted.
ssh admin@<pfSense-IP>
SSH via Key
If you want to configure ssh key then follow this, mind you, you still need to enable SSH in firewall as shown above. Video suggested: https://www.youtube.com/watch?v=oakOE2iDkhU
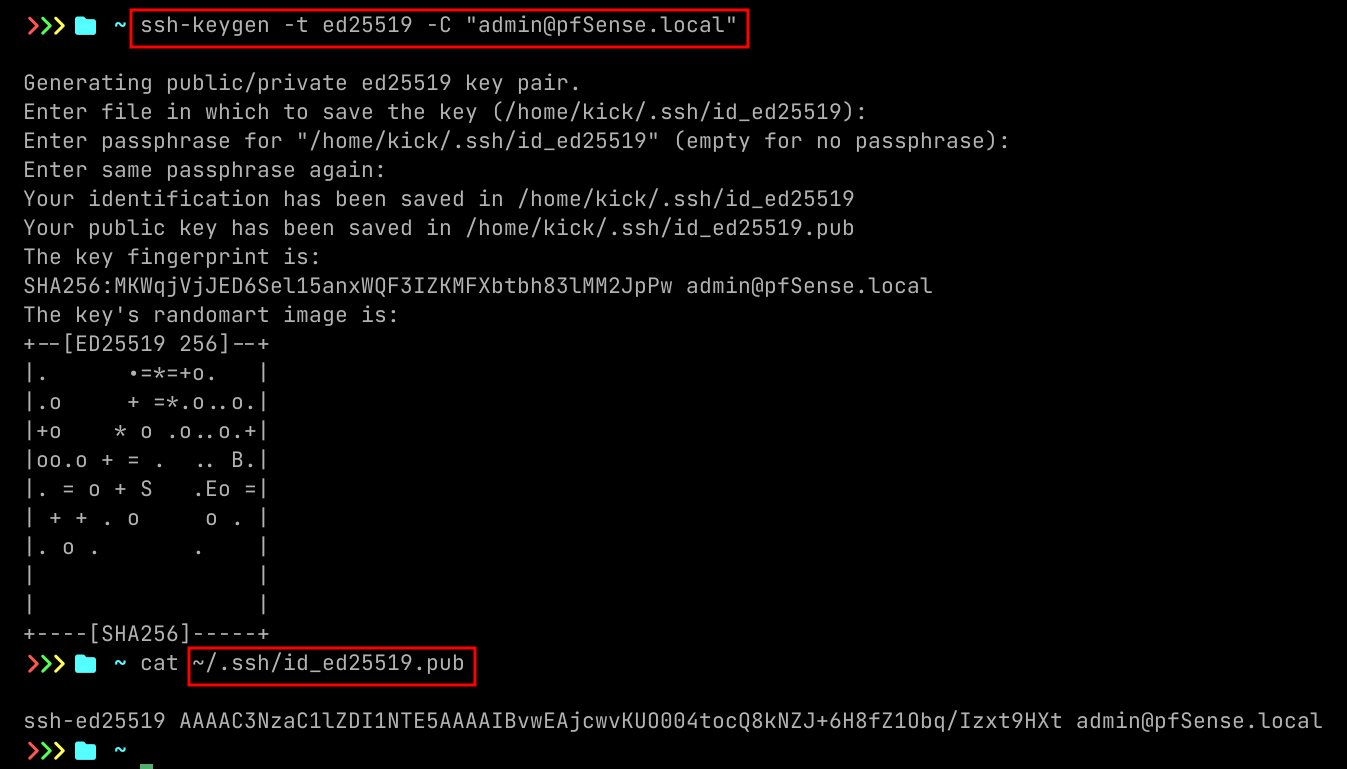
Create SSH keys in Linux
ssh-keygen -t ed25519 -C "admin@pfSense.local"
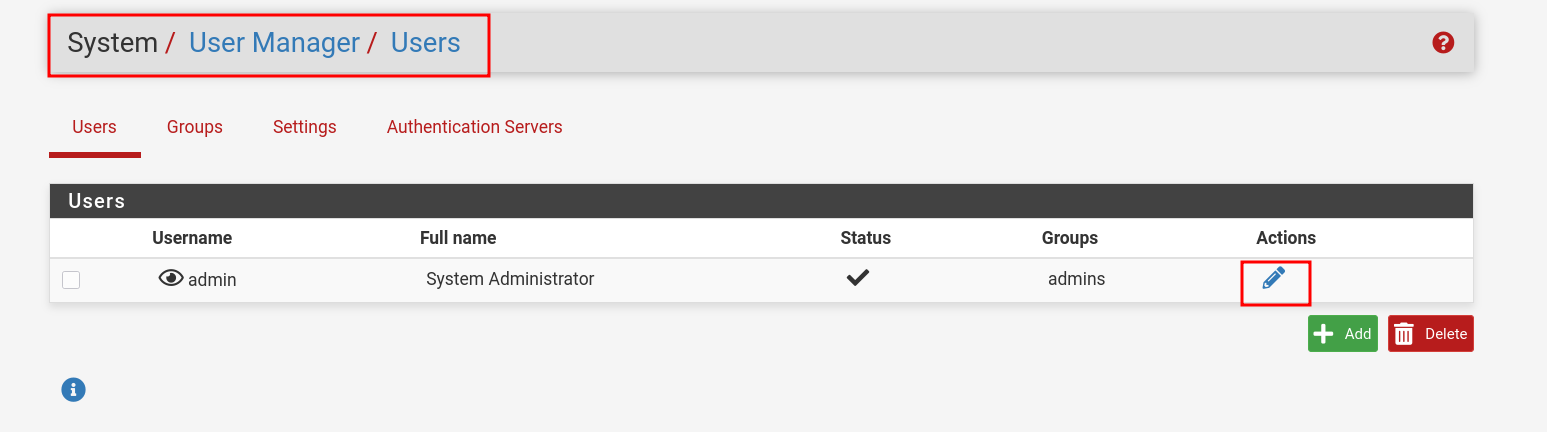
Configure pfSense with SSH key
- Go to: 1. System → User Manager → Users
- Click on "Pencil" icon
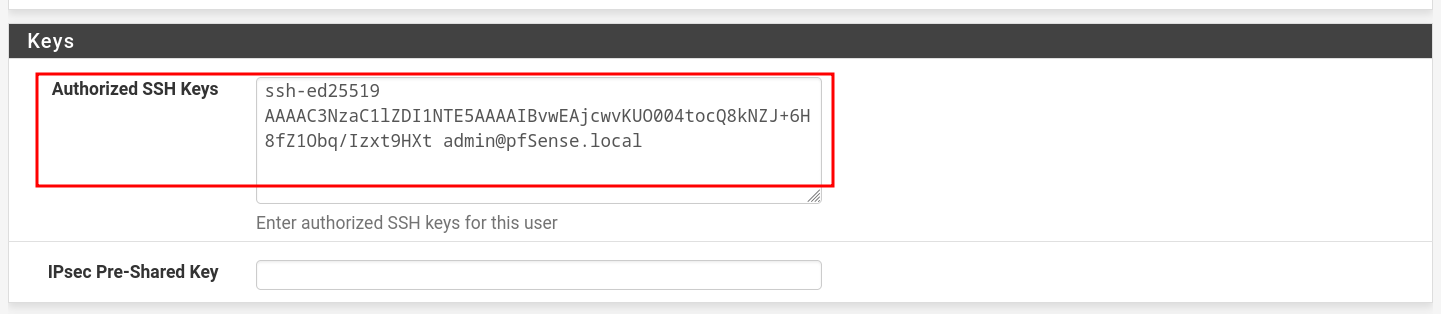
- Scroll down to : Keys
- Paste your Public Key here
Access via terminal
ssh -i .ssh/id_ed25519 admin@$IP
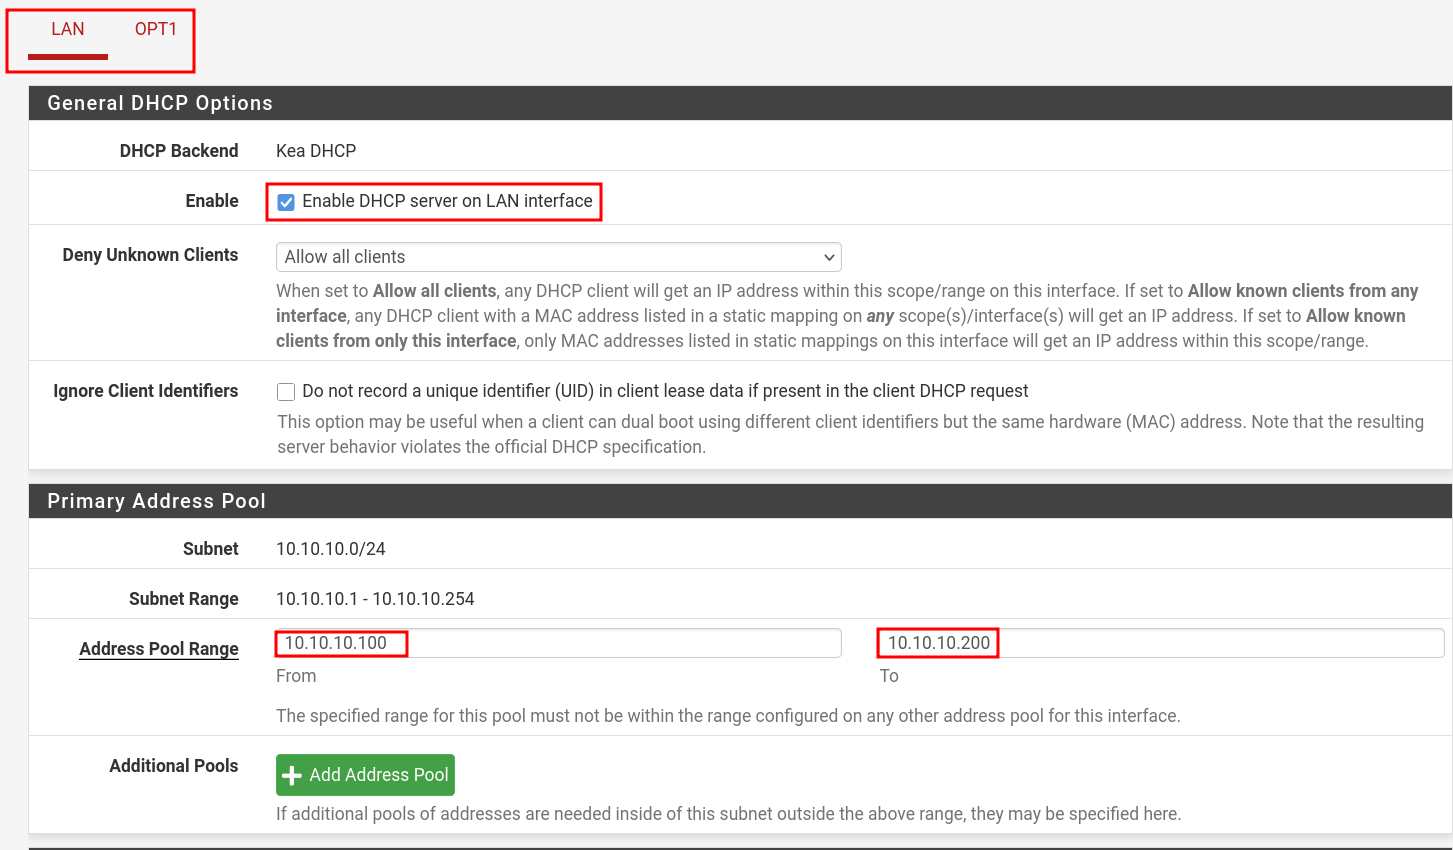
DHCP Configuration
- Go to: Services → DHCP Server
- Choose which interface you want to configure DHCP, below image is showing LAN config.
- Specify Address Pool Range excluding the IP which the pfSense configured on.
- Scroll down and click "Save".
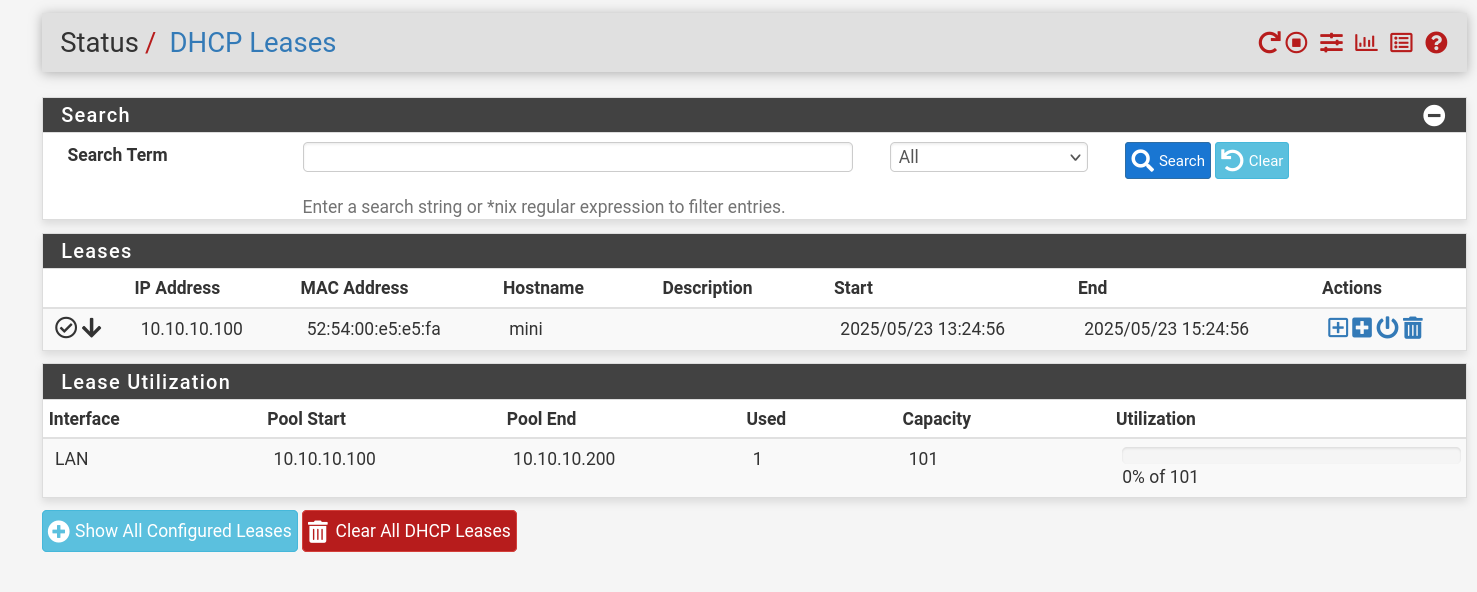
- You can check DHCP leases here: Status → DHCP Leases
DNS
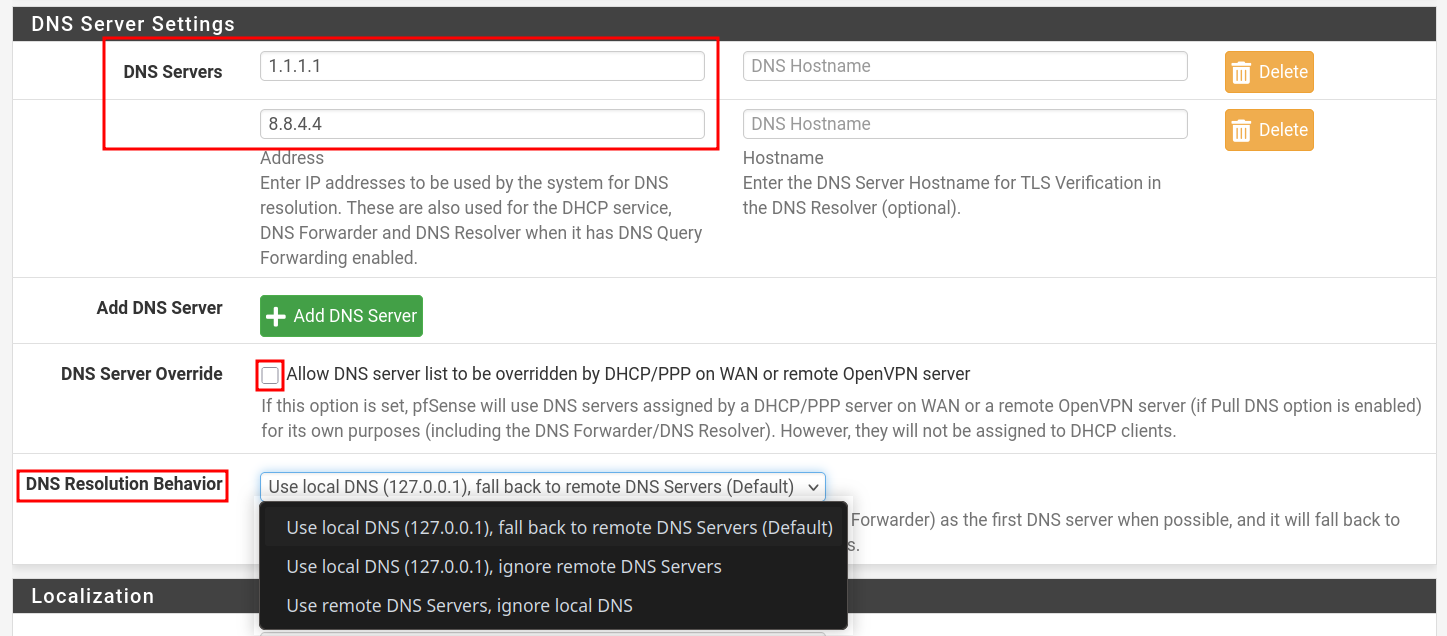
Set DNS Servers
- Go to: System > General Setup
- Scroll to the DNS Server Settings section.
- Enter your preferred DNS servers (
1.1.1.1,8.8.8.8). - Also change DNS Resolution Behaivor as you need.
- Default: Uses local DNS server on the pfSense and fallback to remote servers.
- Check the box "Allow DNS server list to be overridden by DHCP/PPP on WAN ..." if you want WAN-provided DNS. Otherwise, uncheck it to use your own configured DNS servers.
- Click Save.
DNS Forwarder
- The DNS Forwarder in pfSense® software utilizes the
dnsmasqdaemon, which is a caching DNS forwarder. - Unlike the DNS Resolver, the DNS Forwarder can only act in a forwarding role as it does not support acting as a resolver.
- The DNS Forwarder uses DNS Servers configured at System > General Setup and those obtained automatically from an ISP for dynamically configured WAN interfaces (DHCP, PPPoE, etc).
- This service is disabled by default. The DNS Resolver (
unbound) is the default DNS service. - Use DNS Resolver -- it supports both forwarding and resolving.
DNS Resolver
The DNS Resolver in pfSense® software utilizes unbound, which is a validating, recursive, caching DNS resolver that supports DNSSEC, DNS over TLS, and a wide variety of options. It can act in either a DNS resolver or forwarder role.
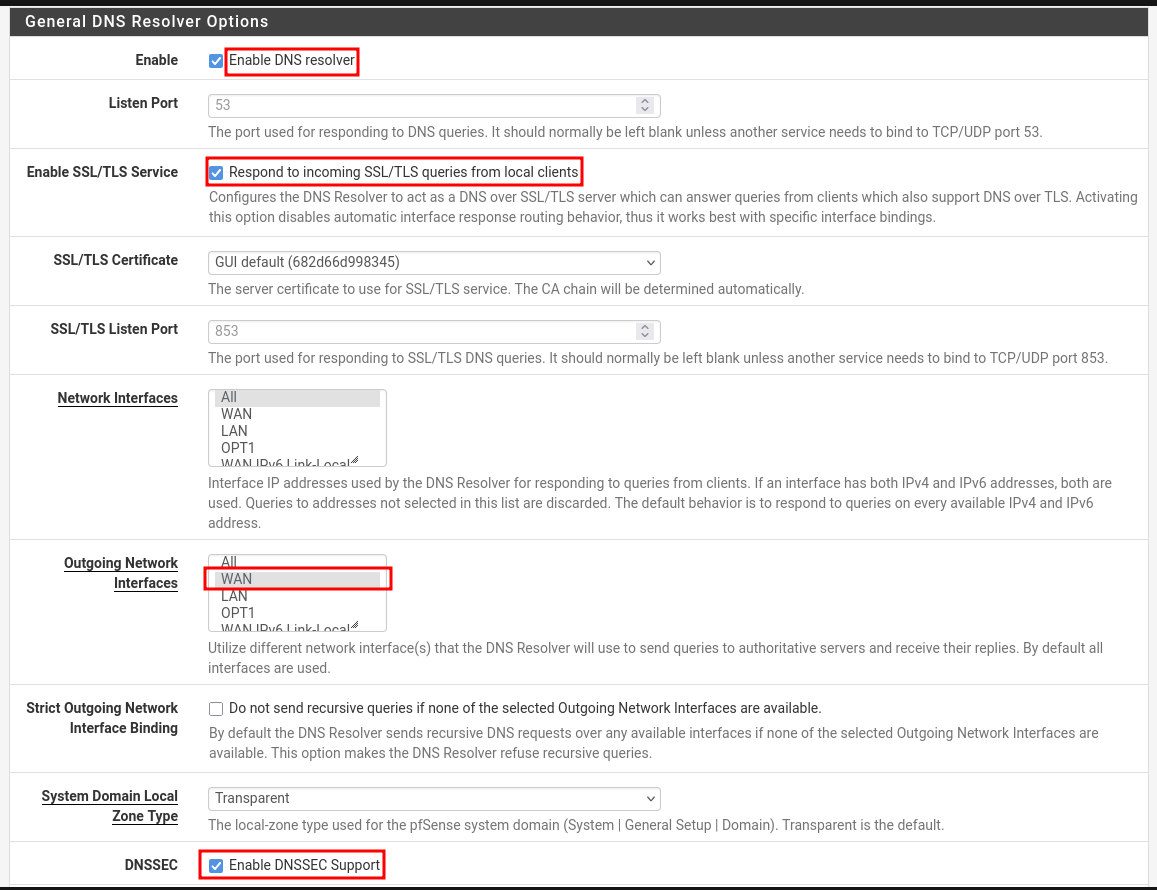
- Go to: Services → DNS Resolver → General Settings
- Enable options are seen in the below image.
- Enable SSL/TLS for encrypted DNS queries from local clients like LAN.
- Use appropriate Outgoing Network Interfaces like WAN to resolve DNS quires rather than sending request to all the interfaces.
- Imagine Unbound (not restricted) sends a DNS query out through LAN, where clients also use pfSense as their DNS.
- The request could circle back into Unbound — a loop.
- This can cause: Timeouts, Failed resolutions, High CPU usage
- Sending DNS out through the organization's
GUESTnetwork (public Wi-Fi) could:- Leak DNS into untrusted networks
- Be sniffed or redirected
- Allow MITM attacks if DNSSEC isn’t used
- Imagine Unbound (not restricted) sends a DNS query out through LAN, where clients also use pfSense as their DNS.
DNS over TLS (DoT)
- DoT requires Forwarding Mode and SSL/TLS outgoing enabled on DNS Resolver.

pfSense (Unbound) encrypts DNS queries to an upstream DNS provider like Cloudflare, Google, or Quad9 — over port 853.
- But Unbound's native recursive resolution (non-forwarding mode) means:
pfSense contacts root DNS servers directly (e.g:
.,.com,google.comservers) — and they do not support DNS over TLS.
DNS over HTTPS (DoH)
- DNS over HTTPS (DoH) is a protocol that encrypts DNS queries using HTTPS (port 443) instead of plain DNS (port 53) or DNS over TLS (DoT).
- pfSense does not natively support DoH in the DNS Resolver (Unbound) or DNS Forwarder (dnsmasq).
- To use DoH on pfSense, you need to run a local DoH proxy that talks to an upstream DoH provider (like Cloudflare or Google).
Domain Name System Security Extensions (DNSSEC)
DNSSEC adds authentication to DNS. It does not encrypt DNS queries (like DoT or DoH) — instead, it ensures that the DNS response:
- ✅ Was not tampered with
- ✅ Came from the legitimate DNS source
- ❌ Does not provide privacy
How it works
- DNS records are digitally signed by domain owners.
- DNS resolvers (like pfSense’s Unbound) validate the signature.
- If the signature is invalid or missing, the DNS query fails, protecting you from forged or poisoned responses. Prevents spoofing.
Testing configurations
Testing DNSSEC
- Run this command from one of the LAN machines set up with pfSense.
10.10.10.1- is my pfSense LAN IP/interface.
dig @10.10.10.1 +dnssec dnssec-failed.org
- Output should be like this. Notice
status: SERVFAIL. - Check with a domain that has DNSSEC enabled like: cloudflare.com
; <<>> DiG 9.18.37 <<>> dnssec-failed.org
;; global options: +cmd
;; Got answer:
;; ->>HEADER<<- opcode: QUERY, status: SERVFAIL, id: 3270
;; flags: qr rd ra; QUERY: 1, ANSWER: 0, AUTHORITY: 0, ADDITIONAL: 1

;; OPT PSEUDOSECTION:
; EDNS: version: 0, flags:; udp: 1432
;; QUESTION SECTION:
;dnssec-failed.org.             IN      A

;; Query time: 2520 msec
;; SERVER: 10.10.10.1#53(10.10.10.1) (UDP)
;; WHEN: Fri May 23 11:37:55 IST 2025
;; MSG SIZE  rcvd: 46
Testing DoT 
From the docs: 
DNSSEC is not generally compatible with forwarding mode, with or without DNS over TLS.
- Change DNS Resolution Behavior to "Use local DNS, fallback to DNS Servers". This seems to work in my rigorous testing.
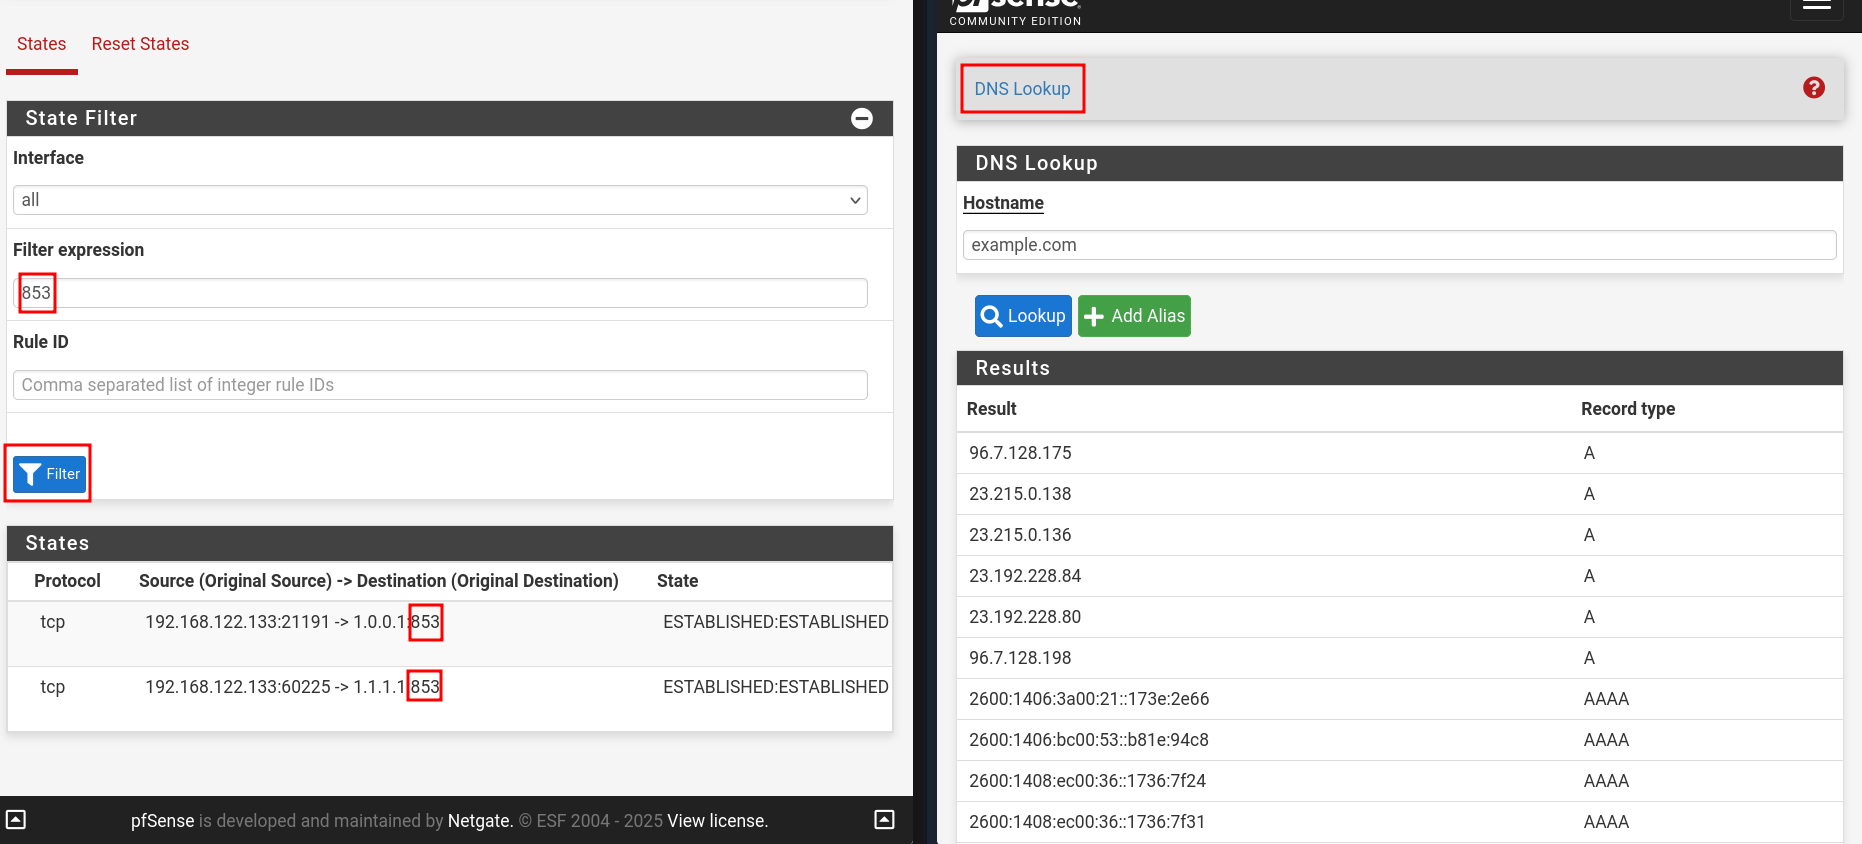
- Test via Diagnostics → DNS Lookup
- Check for states using port
853going in Diagnostics → States → States - Refer to the image below, you should be good.
PFBlockerNG: GeoBlocking, DNSBL
How does it work
IP-Based Blocking
- Downloads lists of IP addresses known for malicious activity (malware, bots, spam, etc.), or from specific countries (GeoIP).
- Creates aliases (groups of IPs).
- Uses pfSense firewall rules to block or reject traffic to/from those IPs.
DNSBL
- Runs a local DNS resolver with unbound (built into pfSense).
- Intercepts DNS queries for known ad/tracker/malware domains.
- Returns a fake IP (like 10.10.2.1, the IP you configured for Virtual IP) instead of the real IP.
- This "blackholes" the domain — no connection can be made.
- Example
- our device asks: “What’s the IP of
ads.evilsite.com?” - pfBlockerNG responds: “It's
10.10.10.1.” (a dead end) - So the ad never loads, and no malicious content gets through.
- our device asks: “What’s the IP of
Configuration
DNSBL (DNS Blackhole List — blocks ads, malware, trackers)
- Go to : Firewall → pfBlockerNG → DNSBL
- Check Enable DNSBL.
- Set Listen Interfaces for outbound and inbound on PFBlockerNG → IP : IP Interface/Rules Configuration section
- Check Permit Firewall Rules (to auto-create rules to access DNSBL Webserver (block page).).
- Global Logging/Blocking Mode:
- No Global mode: Logging & blocking depends per
block listsettings - DNSBL mode: Domains are sinkholed to the DNSBL VIP(Virtual IP) and logged.
- Null blocking (no logging): '0.0.0.0' will be used instead of the DNSBL VIP and not logged.
- No Global mode: Logging & blocking depends per
- Save settings and reload in Update tab.
IP Blocking
- Go to : pfBlockerNG → IP
- ASN Configuration: Enable ASN Reporting for ASN of the logged IP and populate ASN IPinfo Token with it's token.
- MaxMind GeoIP configuration: Populate its fields for GeoBlocking
- Kill States: After each update, this removes any active connections involving blocked IPs.
GeoBlocking Video suggested: https://www.youtube.com/watch?v=q1X0K-wzlTg&t=106s
- Go to : IP → GeoIP
- Configure action of the preferred continent.
- Click pencil icon on one of the listed continent like: Asia.
- Select countries with
ctrl + click. Example: China, Pakistan, Turkiye.
- Configure the List Action, and "Save" and reload.
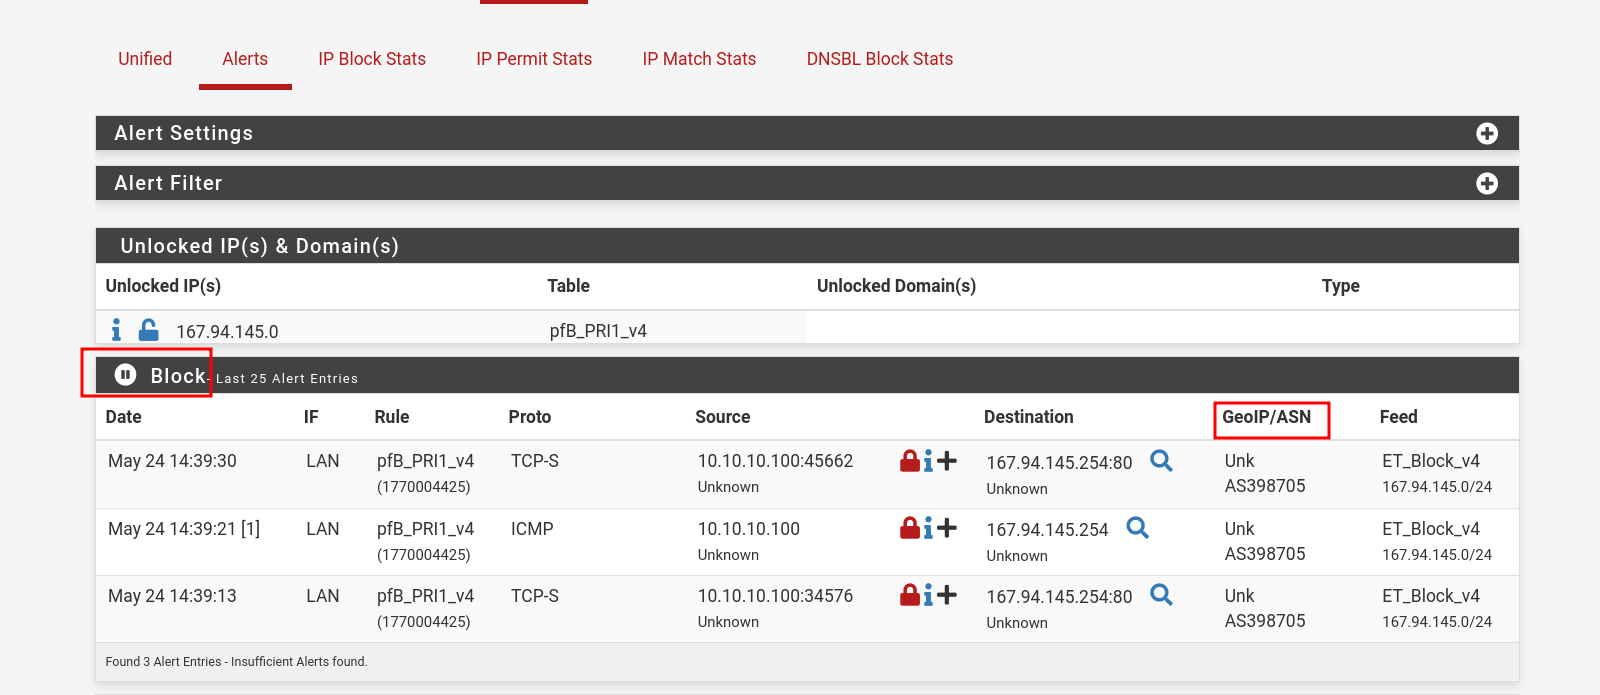
Here pakistan.gov.pk website is blocked.

⚠️ Note: Requires MaxMind GeoIP key (free with account).
Threat Intel Feeds
- Go to Feeds tab.
- Check feeds like:
easylist,adaway,malwaredomains, etc.
- Click plus icon to add, then go to Update tab and run Force Reload - All
- ping/curl an IP from one of the IPs from feeds that are active.
- And check alerts generated in Reports → Alerts
- We can see ASN info as well that I configured in pfBlockerNG → IP with https://ipinfo.io/ API.
VPN: OpenVPN
Video suggested: https://www.youtube.com/watch?v=I61t7aoGC2Q&t=148s
We need to configure these: Certificate Authority to sign certificates, Server Certificate (used by OpenVPN) to prove its identity, and the client certificate. It's better to view walk-through videos to configure these than step by step instructions.
🔄 How OpenVPN Works
- Startup
- Server starts and listens on port 1194.
- Client starts and connects to server.
- (Optional) TLS Auth Check
- Before any TLS handshake is accepted, server checks HMAC on packet using
ta.key.
- Before any TLS handshake is accepted, server checks HMAC on packet using
- TLS Handshake
- Client and server exchange certificates.
- Each verifies the other's certificate via the CA.
- TLS keys are negotiated.
- Key Exchange
- A secure session is established using TLS with DH or ECDH.
- A shared symmetric key is derived for encryption.
- VPN Tunnel Created
- A virtual interface (
tun0) is created on both ends. - All traffic is encrypted and routed through this interface.
- A virtual interface (
- Data Encryption
- All traffic between client and server is encrypted with the symmetric key.
- Client Receives IP
- Server assigns an internal VPN IP to the client (e.g., 10.10.3.2).
- Client can access internal services or route internet traffic via VPN.
OpenVPN Client Export Utility
- Install this from Syatem → Package Manager → Available Packages → Search for
openvpn-client-export - Configure Host Name Resolution to public IP for remote access over public network.
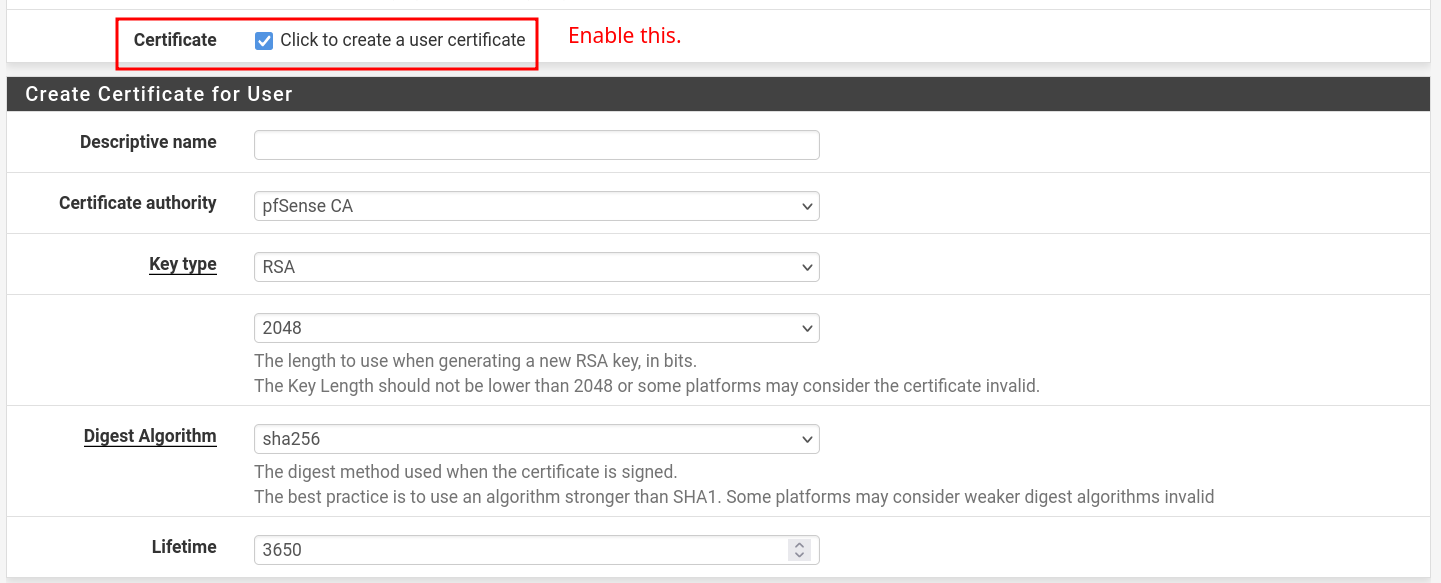
- Create a VPN user here: System → User Manager → Users
- Add user certificate: Create Certificate for User section. And "Save".
- Go to: VPN → OpenVPN → Client Export Utility
- The user you created should be visible here. Export the desired option.
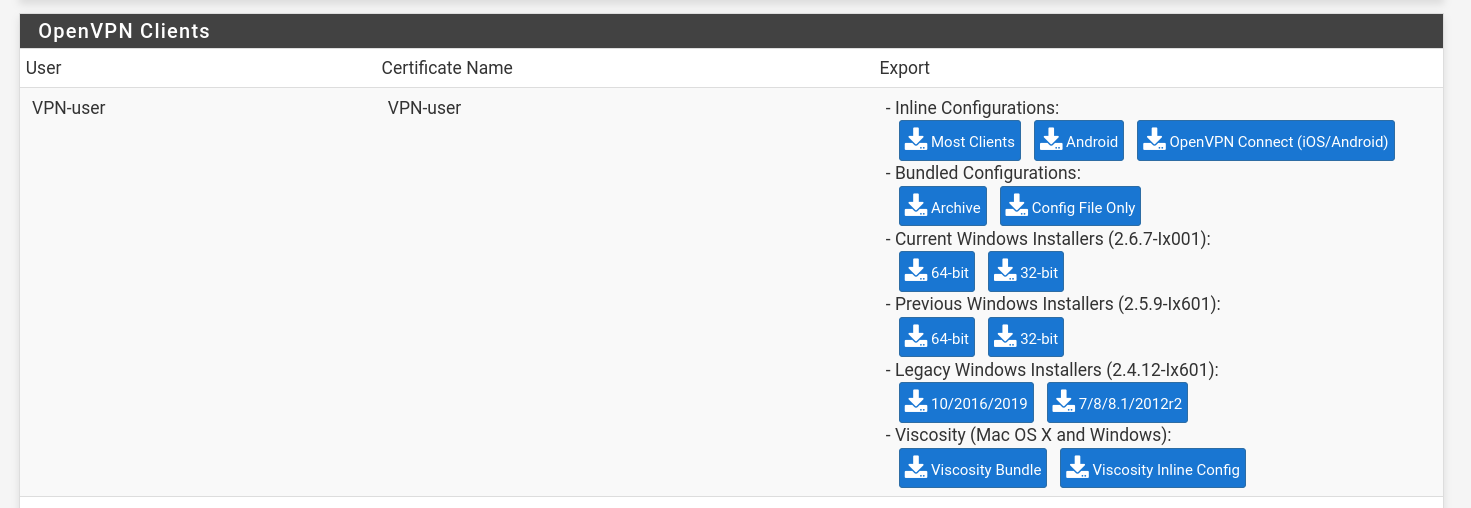
The exported .ovpn config includes:
- The client certificate
- The client private key
- The CA certificate (so the client can verify the server)
- Optionally, the TLS key (if used)
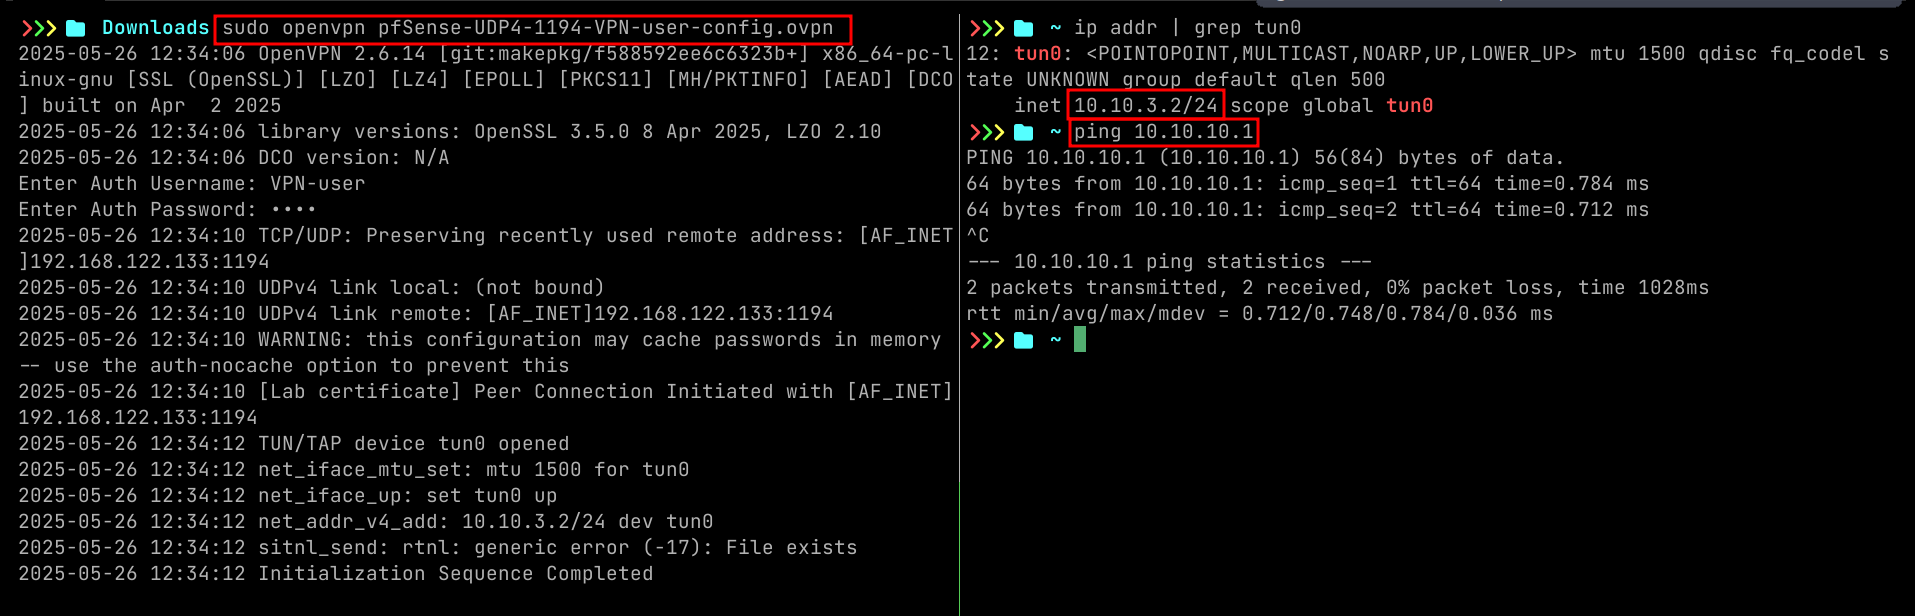
Test VPN
- Image should be self explanatory.
Security Tips
- Use 4096-bit keys for long-term security
- Disable compression (can lead to VORACLE attacks)
- Use TLS-Crypt instead of TLS-Auth for additional privacy
- Restrict users with firewall rules or user groups
IDPS: Snort
Video suggested: https://www.youtube.com/watch?v=SapAcfHbQSE&t=192s
Test snort
- Custom rule
alert tcp any any -> any 80 (msg:"TEST ALERT - Visit to example.com"; content:"example.com"; http_header; sid:1000001; rev:1;)
- curl from one of the LAN machines:
curl http://example.com
- Go to: Services → Snort → Alerts
